Apr 10
14
DHL Domestic
It’s not often we get such a clear concise brief..

DHL Exchange brief
Something like that!!
It wasn’t quite the brief we were working to but it’s surprising just how young art directors are starting these days – especially under the watchful eye of their mothers..
Photographs were required for a marketing leaflet for a revamped service and this photography was located in Hounslow, both in offices and at home. The objective was to document the exchange of faulty goods or goods requiring upgrades in both offices and homes for a marketing leaflet.

DHL Exchange delivery, Hounslow

DHL Exchange in offices, Hounslow
After arranging the people, products and transport the most was made of the components available to maximise any potential future use, so besides the 2 images required for immediate use, library images were created to supplement future DHL requirements.
It is a misunderstanding by many people that images created for brochures and marketing have an infinite time to be produced. The opposite is true. When vehicles are taken out of service, or machinery is shut down for photography, the cost of downtime can far outstrip the cost of photography directly, so on any occasion that opportunities arise, then the most is made of them.

DHL Domestic
After completing the office environment exchange and incorporating a Delivery Bay variation and vehicle drive by as it left we headed into Hounslow for a domestic delivery with a different agent.

DHL Domestic Exchange, Hounslow
Apr 10
14
Makro Mailing Sales Catalogue
With the rush to the Easter break came an urgent demand for a four person shoot in a pub. With the World Cup approaching, those all important consumables needed to be publicised and moved to the retailers shelves.
‘We need a pub, some food – chips, sandwiches, drinks, a television depicting World Cup football and it needs to fit in ‘this’ shape for the cover’.
With time, these things tend to be easy to arrange, but when there’s an urgency then you need to call on other professionals and get them involved. It helps knowing people with with pubs, bars and hotels as well as the model bookers at the agencies who can turn things around at short notice.
The layout was fixed, so the composition needed to fit the layout rather than be pictorially balanced. It seemed to work out fine.

World Cup promotional catalogue
An early morning start on a ‘quiet’ day ensured that we caused as little disruption as possible, and the timings were perfectly in line with the managers predictions with our party finishing just before the rush.
Being able to synchronise flash at shutter speeds greater than that which the camera is designed to do defies all logic of flash X-sync as we know it as it generally results in an associated black band at the bottom of images or even longer ago – at the sides. Today the solution to avoid these bands exists in a variety of packaged solutions yet, doesn’t NEED to be provided by any packaged product to obtain best results at all. I discovered this technique in 2008 after using it for about a year without actually realising it. It was only after offering help to another photographer that this came to light. It was first discovered not with any sophisticated high value equipment as used now, but with cheap, mostly unreliable radio transmitters and receivers. Both Radio Popper’s and Pocket Wizards’s are doing similar things to this with their packaged products – but the solution to achieving it existed long before either of these companies put their label on it, or started jumping off sofa’s to illustrate it. It works far more effectively as well.
To extend your shutter speed and retain sync with flash in a basic form all you need is a camera/flash combination capable of HSS or FP mode, radio transmitter and receiver, and a flash unit with a longish flash duration.
An explaination of the OEM solutions.
HSS or FP mode (if you use Nikon) is a solution to exceeding the maximum sync allowed by a camera. This solution is only the provision of a continuous light source for the duration of the shutter speed. For ease of understanding, it’s like an artificial sun or continuously illuminated light bulb with an ‘On/Off’ switch… that’s all. The beauty of it in speedlights is that it’s a conversion of what normally is an instantaneous flash of light into a continuous source by the continual pulsing of the flash tube. Convenient – because you don’t need to go and get a lightbulb and plug it in.
In order to make this work, the manufacturers needed to change the sync point at which the ‘fire’ command is provided to the modified flash – now a continuous pulsing source. In order to work, the ‘light’ needed to be turned ‘On’ at the beginning of the exposure and ‘Off at the end. This requires the X-sync signal to be advanced to the point where the initial opening of the shutter happens, rather than later. ‘On’ just before the first shutter starts to expose the sensor and ‘Off’ just after the second shutter has finished the exposure.
Both manufacturers, Canon and Nikon have different ways of doing this. With Nikon, it’s a body function. You set the body to FP mode which, should you select a shutter speed greater than one which can be catered for standard X-sync it automatically switches the X-sync point from the ‘first shutter sync at fully open’ position to ‘first shutter sync at – just about to start’ position. Canon do this by setting HSS on their Speedlites.
When a HSS capable flash unit is fitted to a HSS FP enabled/capable camera and the X-shutter speed is exceed forcing the camera to use HSS or FP mode, the X-sync automatically changes. Rather than synching ‘fully open’ it now synchs at initial opening thus allows a continual exposure across the whole frame whilst the flash pulses.
So far so good, you now understand how the pulsing helps to provide illumination for shutter speeds beyond the normal X-sync.
This has it’s drawbacks; Speedlites cannot provide this pulsing at the same power as they can by providing an instant flash. In order to provide this pulsing they need to operate at a lower power level in order to maintain a constant level of pulsing over the duration of the exposure. The penalty for this is just over 2.5 stops. Unfortunately, just when you might be needing more flash power because things are getting brighter – you get robbed! Twice.
All shutter speeds above x-sync operate over one time duration. That can’t be right surely?? Well – it’s not exactly correct, but it’s mostly true. From the point that the whole sensor is exposed entirely and momentarily, up to your maximum shutter speed the duration of those speeds, say between 1/250s – 1/8000s have very little time difference in duration between them. The only thing that changes in these shutter speeds is that the gap between the first shutter and the second shutter following it, as for increased shutter speeds, simply the gap narrows. The speed of the traveling shutters remains the same.
A sensor is fully exposed by an open shutter at 1/250s. If you take ANY point on that sensor the total time it will be exposed for is 1/250s. This is true for the point at the top of the sensor AND the point at the bottom of the sensor. It is worth noting that these two points might receive the SAME exposure time of 1/250s BUT those two 1/250s are at completely different times. (In some cases at really fast shutter speeds say 1/8000s the top part of the sensor has been exposed and completed its exposure BEFORE the bottom part of the sensor has even started exposing. Such is the action of a focal plane shutter which uses a slit.
Why all this shutter talk when you want to use flash?
This is all establishing the ground rules. It’s been pointed out that even at 1/250s when the sensor is fully exposed, the duration of this exposure is actually longer. Just to recap: Because two separate points DON’T receive the same 1/250s exposure and they can be potentially 1/250s apart the total duration of this exposure is now 2/250s. Why that duration again? At worst THIS example is easy to work out. The very first point on the sensor being exposed start to finish is 1/250s the whole sensor overall is 1/250s and the very last point on the sensor to be exposed start to finish is 1/250s.. Because 1/250s is the maximum time which both these points will be momentarily and simultaneously exposing, AT WORST this total duration is going to be 1/250s (fist point) + 1/250s(second point) = 2/250s. So for this scenario, if we needed a continual light source for the duration of the exposure we would need 1/125s.. That is; Turn ‘On’, wait 1/125s, turn ‘Off’.
But we don’t need to cater for 1/250s sync. At 1/250s we don’t need any pulsing flash to assimilate a continuous light because the flash can illuminate the whole sensor concurrently the moment it is completely exposed. Duration of the flash can be anything shorter than 1/250s, and more often than not they are going to be faster than this, and in varying degrees. A longer flash duration wouldn’t be a problem, but you would have less benefit from it as any flash duration longer than 1/250s would be wasted on the surface of the shutter. This would be like standing outside a room with a light illuminating it, and shutting a door.. the light’s still on doing it’s stuff, but you’re just not seeing it.
Shutter durations needing to be catered for.
Any shutter speed with a duration shorter than (1/251s) will have part of the sensor covered by the second shutter in all circumstances. So what if we can turn our light ON and OFF to fit that maximum time the shutter is exposing – and then keep that timing? Well, this would be pretty darned perfect. As shutter speeds increase the flash duration required marginally reduces. At lower speeds around 1/250s the reduction is proportionately greater than at faster shutter speeds of 1/4000s – 1/8000s. These flash durations are easier to understand if explained metrically. Where a 1/250s shutter speed is equivalent to 4ms, then the duration of flash needed or of the pulsating counterparts are in the realms of 1/250s needing a duration of 8ms (2x 4ms) and 1/500 needing 6ms, 1/1000s needing 5ms, 1/2000s needing 4.5ms, 1/4000s needing 4.25ms. Matching these durations would be an advancement on current technology, although even with advancements in speedlight optimization, not enough to justify the use of the ‘old’ slow technology.
In tests, there are numerous flashes which satisfy these criteria. Amongst the lighting tested and which I use are included Quantum, Lumedyne and various Bowens – specifically the 6K pack and Traveller G. Particularly relevant to my circumstances, and most often used are the Quantum 400ws packs and the Lumedyne 400ws and 800ws packs combined with either FreeXwire transmitters and receivers or a Quantum Trio on camera set as a controller. I find having one consistant radio system running throughout my whole equipment range makes life a lot easier. These combinations perform beyond the normal boundaries and outperform Speedlights in all regards.
Other flashes tested (which work) are Metz 45, Metz 60, Sunpak 622 and even the Nikon SB800. In fact, the Nikon SB800 actually performs better when it’s not set to it’s proprietary FP mode, and instead ‘hacked’ in this respect.
Update: Feb 16, 2011
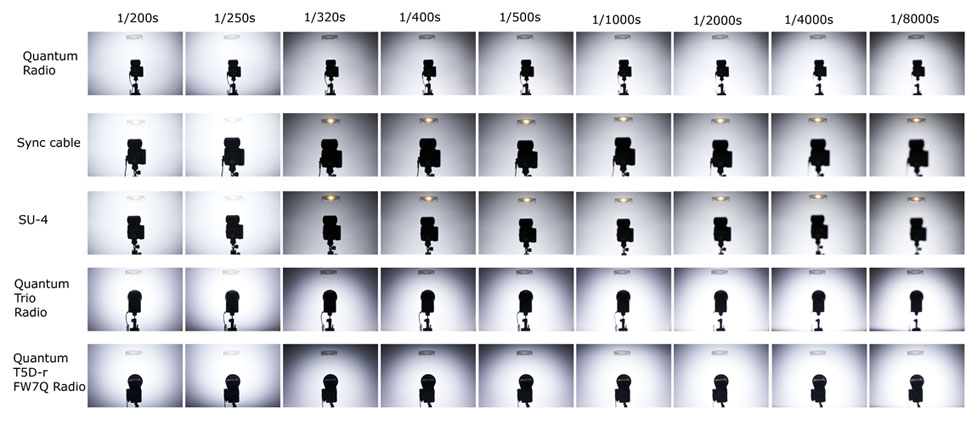
Here’s an example of increasing the shutterspeed and retaining Ambient/Flash Ratio. Once you hit maximum x-sync you can mostly retain ratio, with bad speeds between 1/320 – 1/500s and best results around 1/2000s. As the shutterspeed increases by 1 stop, the aperture has been opened 1 stop.
The first flash unit is an Nikon SB800, then a Quantum Trio and then a Quantum T5D-r
Recently, there has been some new equipment released which has the ability amongst other things to extend shutter speed whilst only slightly affecting effective output. This only works up to a certain point, but results seem to be favourable for extending our smaller flash units abilities to operate in bright conditions. This does not make them a substitute for our other systems, but will certainly render or speedlight collection more useful.
I managed to optimise my shutter and flash combination to allow 1/800s sync with little loss in output. When I say little loss, there might actually be 1/3 stop, however by doing this I manage to utilise the maximum that the ControlTL system can provide by balancing output and even frame coverage.
I think sometimes people forget – if you want more light on the subject in the middle of the frame you don’t have to light the extremeties. Sometimes, shadows caused by shutters can be hidden depending on the subject. Much like using a grid to only light a subject area. It’s particularly useful in bright conditions which I’ll move on to shortly.. Essentially, by cheating the sync you can get about +1.66 stops more benefit to your flash than you could have done by sticking at your max. x-sync. It’s a compromise and would be a substitute for not having enough output in the first place, (which I wouldn’t be guilty of), but it works.
Here’s a sample.. different to the previous samples, all these are shot at f13 100 ISO. I estimated that the 1/800s shutter is about the best for increase in output and even coverage. The photoshop values of the white areas are around 250’s for the 1/250s shutter and around the 235’s for the 1/800s shutter REMEMBER This is a compromise.. it’s a balance of output, vignetting and bearing in mind – where it’s going to be used (e.g. outdoors, bright ambient, centred subject ) :
With this system, I could optimise for a higher shutterspeed, but even so, the reduction in output is greater than the increase in that shutterspeed – so the increase is non-productive.
Lots of people are saying ‘we get more’ using this system – but nobody has actually quantified it. Unless it’s quantified – you can’t exploit it, and you’re only guessing. I’ll try to explain, but unless you don’t mind techie mumbo jumbo I’d leave now, however since you’ve got this far you might be ready for it.. here follows a bit of mental gymnastics:
I’ve said I can get 1.66 stops more benefit from the PW’s.. so let’s use that as an example.
An SB800 generally gives f10 @ 10ft @ 100ISO @ 50mm (without splitting hairs).
Bright day exposure is 1/100 f16 100ISO, which miraculously is 1/250s f10 100ISO using 1/250s at the top of the regular x-sync shutter range.
So – bright day flash GN=100, so range = 10ft for balanced light.
OK, I’m shooting in bright sun, my subject is 20ft away, it’s maybe a group shot . My exposure level is 1/250s f10 – and so my subject is underexposed 🙁
My flash (this flash) is underpowered. Simple. No amount of increasing my shutterspeed will improve this as all I get as a result is a darker background.. I don’t want a darker background, I want it right.. as it currently is.. I do need more light on my subject though. In normal circumstances the only solution is to add more light, but now we can cheat and retain sync up to 1/800s (the exact range for this is depending on whether PW updates their software. Currently only 1/500s is allowed with on camera flash and I’ve informed them of their error).
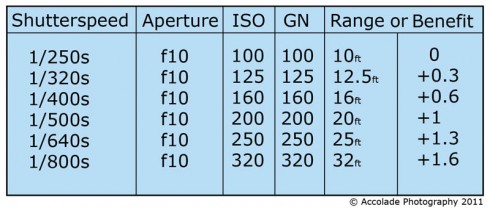
So let’s cheat.. knowing from my tests that my GN will stay pretty constant up to the 1/800s I optimised for and illustrated by the fairly consistent flash output results, I can now adjust my ISO until I get the GN needed to provide f10 at 20ft – which is ISO200.
So now, at ISO 200 f10 and 1/500s – this matches my previous ambient light of 1/250s f10 @ ISO 100, but by miracles of GN I now have a 20ft range @ f10 OR a +1 flash output at the 10ft.
That’s fine, but could be better.. setting ISO 320 would give me GN=320 at 1/800s and still be balancing the light – this time I could light a subject at 32ft, or closer with a greater light value.
This is the opposite of darkening the background. This is adding output, without actually doing it.
By the way, this table is 15% proud on the distance claims due to f10 in fact being f8.6, however, calculations are a lot simpler in multiples of 10 🙂
By increasing ISO by set amounts, this offsets the darkening of the ambient bringing it back to normal, whilst at the same time increasing the Range of the flash OR the amount of flash illuminating the subject. Whichever is decided is neccesary can be accomplished by adjusting combinations to suit.
The PW’s worked out unreliable and restrictive in use, so they’re not being used currently.
Using High Speed Sync (HSS) or FP sync with Quantum
Using a Quantum X5d-R in a medium (Gary Regester) softbox I just did a quick test/illustration of how HSS sync works to balance or potentially overpower sunlight. It’s a bit rough and read, and the images are JPG’s straight out of camera reduced in size. In the last image I asked the model to step forward a little in expectation of the drop in flash output.
This was with a D3x, 24-70 f2.8 @100ISO using a FreeXwire transmitter and D22-wr adapter on camera, nothing else. The same can be achieved without the D adapter but using a speedlight in it’s place instead.
There’s no pulsing of the flash involved, you just use full power output whether that’s 160ws, 200ws or 400ws configurations. At these settings, the Quantum flash durations seem pretty much perfect.
I don’t use this very much, but in situations where people require, or use HSS regularly, this technique won’t suffer any loss of output or ratio to daylight. At the top end of the Shutter range (1/8000s) you get a little more advantage over sunlight than you do at 1/250s. You do get to chose whatever aperture you want to use and can match this to whatever the correlated ambient shutterspeed would be, or by adjusting the position of the light overpower the ambient.
From the 400ws illustrated, reduce by 1 stop for a 200ws configuration and a little more for a 160ws (T5D-r) configuration.
Sure beats the heck out of mounting multiple speedlights together, especially avoiding the near 3 stop loss as well.
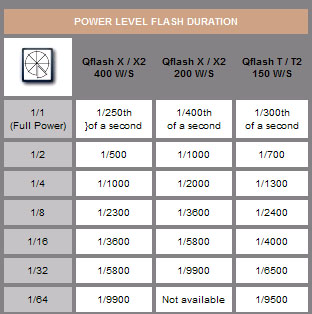
The success of achieving high speed sync via radio transmission relies on a variety of factors. The first main factor would have to be the duration of the flash used. Although you can obtain decent results by using a Nikon or Canon speedlight which have relatively short flash durations, the better results are obtained by those flashes providing the longer durations. The Quantum X5d-R, which I favour has the longest duration of the Quantum range at 1/250s in the 400ws configuration. Both the 200ws Qflash using a Qpaq and the 160ws Qflash using a turbo type battery offer relatively long durations too as indicated by the following table from Quantum:
Along with the long flash duration, a fast radio is required. If you plan on using the Quantum FreeXwire components for this purpose, the fastest configuration is to have all the channels active which will then provide 1/3000s triggering.
Equipment by .
Mar 10
8
Gimp my Flash !!
Working in all sorts of environments means having durable equipment. Moreso, working outdoors in the UK, or coverng events in what must be the wettest county in England, and where whimping out at the first sign of a tropical downpour would be severely frowned upon and certainly not professional !
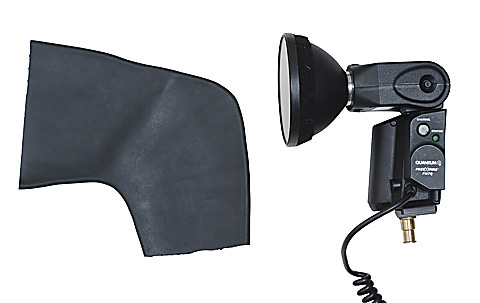
After a particularly WET (atrociously WET !!) couple of incidents near lakes and a few days shooting in high humidity/Sauna / Rainforest type environments – it was time to dump the plastic shopping and food bags in favour of something more durable, skin tight, waterproof and protective.
It was time to Gimp my flash !!
Plastic bags are fine for lining bins and putting butties in, but flash heads and packs at over £1,400 a piece deserve something better. But what?
Sure, there are specialists housings which are waterproof to 1,000’s of feet, but I’m not going there. 8 foot high is about right, and whatever it is – it needs to be portable… can be fitted into an already bulging lighting case.. and be ready for action when needed. So what could it be?
Staring at rubber clad athletes at a recent event sent my mind wandering.. My flash units need wetsuits!!
After a lot of searching, measuring, deliberation and messing around a bit.. here we have it.
I decided to buy in a variety of diving boots. The shape of the boots pretty much matched the shape of my location flash, so it was just a matter of getting the right one to fit.
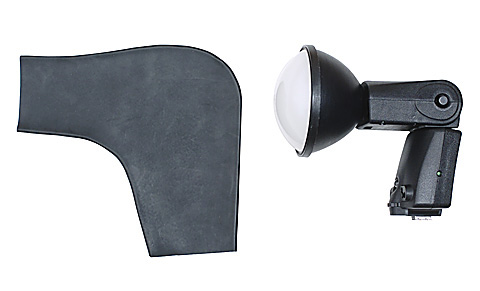
Quantum Trio waterproof cover
The Trio waterproof cover would probably be the less used of the covers made. Normally the Trio would be on camera operating as a controller, and as yet I still need to cut an access hole for the controls. It’s not very likely that the Trio would be used as a remote, especially with T5d-R’s and X5d-R’s available.
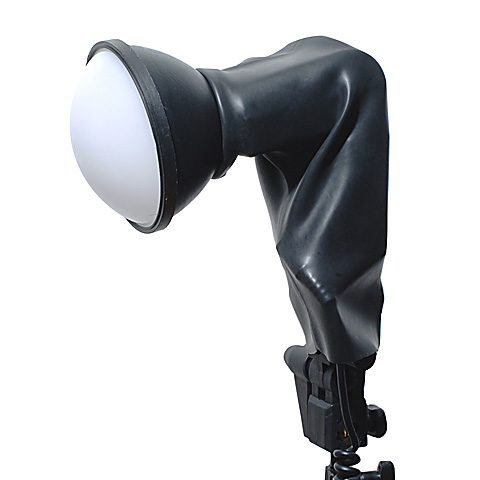
Quantum Trio with Waterproof Cover on a lightstand
Quantum Trio on lightstand with waterproof cover
The Trio waterproof cover fits quite snuggly around the body, but a little tight around the head. It’s a bit of a stretch to get it fitted, but once there it seems to work well.
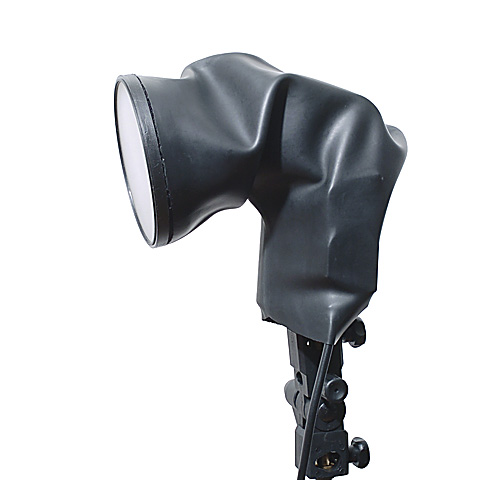
Quantum X5d-R with waterproof Cover on a lightstand
Mostly, 4 of these types of lights would be used linked to the camera via radio control. The complete coverage of the flash head in rubber would not hinder the use or operation of the flash units since all settings are changed without touching the flash units. Of the two types of cover, I expect that this one will be used most. The cover around the reflector bowl is a more convenient shape which accomodates the reflector better and the larger size chosen to accomodate the additional radio receiver makes the cover easier to fit and remove.
On a seperate issue, there is potential for leaks to penetrate between the reflector and the mount, an 8mm neoprene washer soon sorts that out. I have a special order being made which should fit around the collar between the reflector and the head, just how much these are needed, or how effective they may be might be debateable, but if they might help to prevent water getting across the HV terminals, I’ll be happy knowing they’re there.
Update:
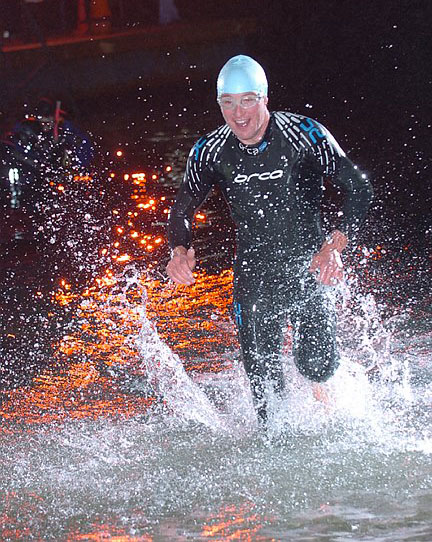
Recently I was faced with the same rain problem, after a night of shooting a swim (yes, NIGHT) I managed to grab this shot of the covers in action.
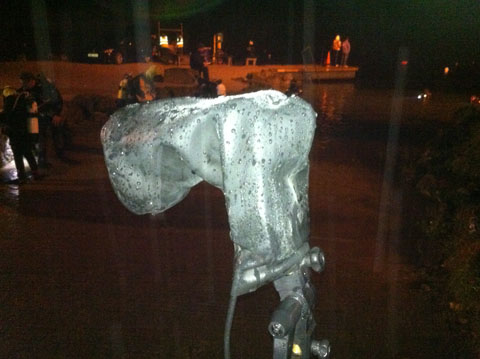
Quantum X5d-R Waterproof cover at a wet nightime event
The streaks on the image above are rain.
For anybody who’s interested, a Quantum Trio was being used as a controller using TTL which was firing two remote Quantum X5d-R’s also in TTL mode controlled by the Trio. The background light was a Lumedyne in an 800WS configuration.
The preparation paid off and here are a couple of photos from the event:

Competitive Open Water Swimming at Night.
Competitive Open Water Swimming at Night. (2)
